
This is part two of a series of blog posts on Planning the Art. We will be posting parts 3 – 6 in the coming weeks so be sure to keep coming back as we’ll be talking in great detail about some of the topic highlighted in last weeks post. If you want to go back and read from the beginning start here.
Creating a piece of pyrography does not start with burning a design into a piece of wood. For me, at least, it starts long before that. It starts when I lay out the design for the piece I am planning to create. That is when I have to start making the preliminary decisions on my upcoming creation. Like the old carpenter adage, measure twice, cut once, it is important that you make careful considerations before burning your piece because, once you start, it can become difficult, if not impossible, to recover from a mistake.
Estimating
When I was in grade school I absolutely hated when my teacher told me that I needed to create an outline for my paper. It seemed like an extra step and a waste of time. What I didn’t realize then was that, creating an outline, allows you to think about structure, to understand the scope, and to make sure you know what you need to gather in order to complete your task successfully.
The same applies in art. Before starting on your piece you should know:
- The size and scale of your piece: this will help you know what materials you are going to need.
- The time it is going to take to work on the piece: whether it is for a commission, an art show, or just to get ready for a market you should know how much time to dedicate to your work so that you don’t take on more work and set expectations accordingly. Knowing the size of the piece also helps calculate the time you will need to complete the project.
- The appropriate canvas: as pyrographers we have a wide variety of canvases to work on. Is this going to look better on a lighter or darker piece of wood? A slab or a cookie? Live edge or clean edges?
Finding the Canvas
Now that you know what your piece is going to look like you should start gathering materials: namely your wood. If you are like me, you likely have a decent sized inventory of wood on hand in your studio. Start by looking through what you already have and determine if that is going to work.
If you don’t have a suitable piece available you’re going to need to find something to work with. There are a few options:
- Local lumber mills: most cities are going to have a great selection of lumber mills that have locally sourced raw wood and semi-milled wood available. The only disadvantage to this wood is it will need to be milled to a workable canvas. Keep in mind when choosing woods, whether they have been dried (whether via kiln or air dried), dry wood is a must. “Green” or newly cut trees that still have sap and are wet do not make for good canvases. It can be virtually impossible to burn onto, and will release more smoke.
- Specialty vendors: companies like “It’s David and Renee” specialize in wood canvases for pyrographers. They are a great option if you want a piece that is ready to go: no fuss, no muss. They do al the work for you: all you have to do is create.
- Hobby stores: hobby stores often have a selection of wood that is designed for crafters. Some woods may be acceptable for pyrography. This can be suitable for some projects but you will be limited in the types of wood, sizes, and quality. Make sure that the ‘wood’ is actually wood, not mdf with a wood veneer top. Take note of what wood it is – as a general rule of thumb you shouldn’t buen on wood that you don’t know, or materials you don’t know. It may look like real wood but be a toxic material if burned into. The wood in the wood crafters section is usually unsealed. But hobby stores may carry other wood canvases like spoons, spoon rests, bowls, etc that you may want to burn on. Take note if it is sealed or bare. If it is sealed you will want to remove the sealant by sanding it before burning into it.
Make sure when you are selecting the wood you think about other things like the weight of the piece. Heavier pieces of wood are going to be difficult to transport and more likely to get damaged en route. Consider how you plan to mount the piece. This is going to dictate how large you want your piece. Look for knots, cracks, wood rot, bowing, bending and quality of the wood.
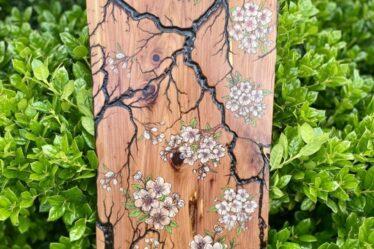
Think about what do you want the end result to look like. Use lighter wood if you want lighter, translucent colors to pop and you want fine details to be seen. If you are using translucent colors avoid dark woods like walnut or ebony and instead use a lighter color wood like clear poplar.
Prepping the Wood
Now that you have your wood, it is time to prep it. If you got your wood from a specialty store there is a good chance you don’t need to do any of this (it’ll have been taken care of for you). If you purchased your wood from a lumber mill or, to a lesser extent, from a hobby store you are going to have to clean the wood up before burning
If you have your own tools, that is ideal, because you can work on the product right in your studio. If, however, you don’t have a full wood shop in your studio then talk to neighbors. Often time they are happy to share their workshops with you. Many cities also have MakerSpaces that you can join which allow you to use professional grade tools to mill your wood.
- Leveling: Planers and jointers are ideal for this type of work. They will allow you to cut excess off your wood and get a level, even canvases
- Cutting: Table saws and jigsaws are your best friends when cutting your wood down to size. Jigs are create for precise cuts and corners. Saws are best if you for large cuts.
- Sanding: You are going to want to finish your piece by sanding it. Raw lumber often has cut marks and is very rough. You want a nice smooth canvas to avoid blobby burns. Orbital sanders and drum sanders are both great for smoothing out your canvas once you have planed it down.
- Laser Engravers: Blasphemy, I know. But laser engravers can be a major asset when prepping your wood, and creating your art. If you use them to cut out the basic shapes they can become an integral part of your toolset.
- Edges: Routers are amazing a making beautiful edges to your canvases. This can give your wood canvas an elegant, finished, professional look.
Once you have your plan in place, you have selected your wood, and it is prepped it is time to move on to patterns. Next week we’ll talk about adding patters to your pieces and burning. Until then, if you have any tips on how you plan the art, let us know. Tag us @bz_furfur and, as always, stay unique.