If you missed part 1 it is here
I came up with the idea to create this series when I was looking back on the past two and a half years as a small business owner, thinking “What are the things that I wish someone had told me about starting a business.” Creating is a full-time job in and of itself and running a business is like adding another full-time job on top of it. Hopefully, this series will help guide you through some of the preliminary steps. Full transparency: if I recommend any products I will include affiliate links so, if you decide to buy any of them, I will get a small kickback. Don’t fret, though, that has not swayed my opinion and every one of the products I recommend is something I fully endorse because I use it myself.
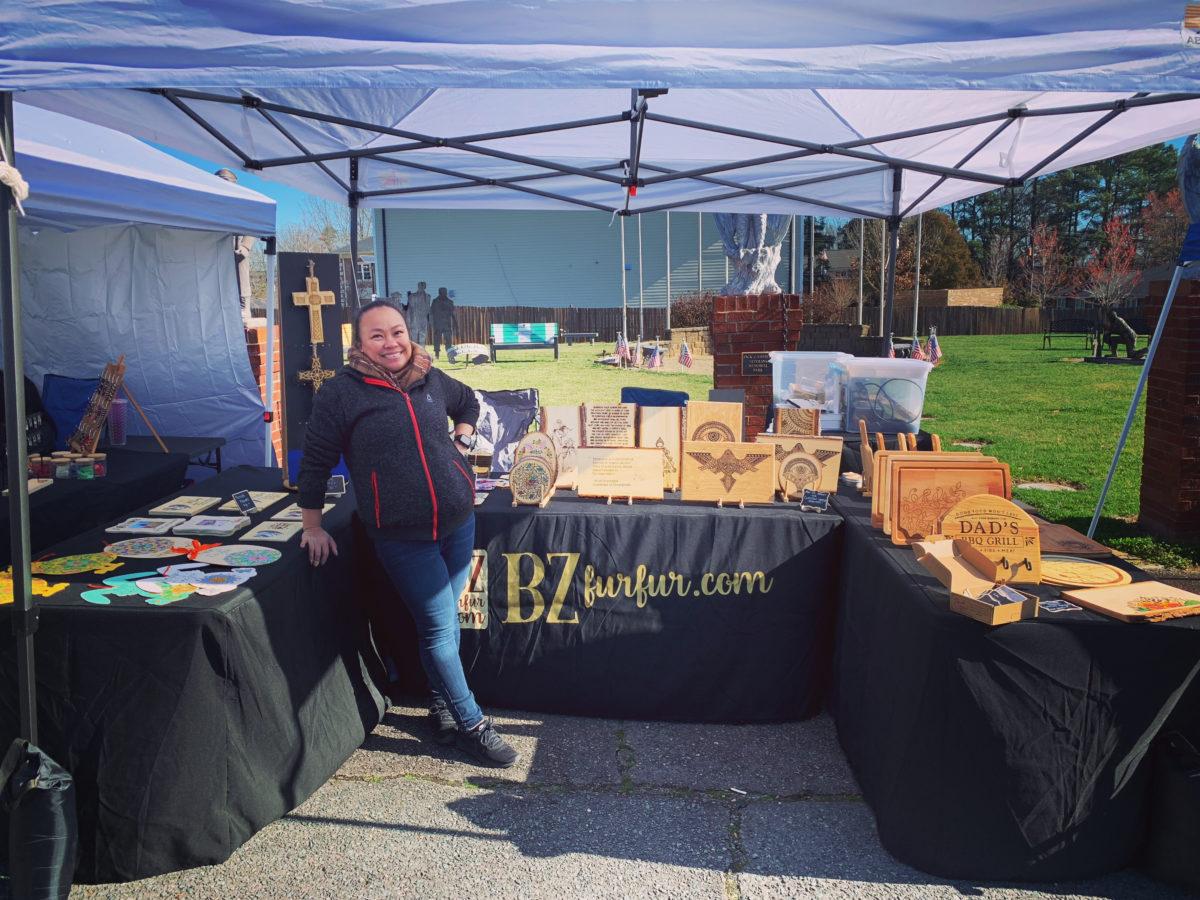
As an artist, it can be extremely challenging to sell your products online. You can start an Etsy shop but, unless your product is extremely niche, it is hard to stand out. Starting your own website is great, but, driving people to your site when you are relatively unknown is not easy either. Sometimes the best way to get an audience is to put yourself out there. Pop-up markets are a great way to do this as they are generally a low cost of entry, most cities and towns have several community organizations that run them, and, if you find the right one, they are a great way to connect with an audience. Today I’ll be going over some of the things I wish I had known before my first market.
The Essentials
- A Quality Tent: If you are serious about doing markets you should get yourself a good tent. We went with a low-cost option for our first tent and, although we tested it out in our backyard and thought it was ok, our first market was windy practically causing the tent to collapse on us. We spent more time that day tightening connections and holding the tent together than we did selling. Ultimately we decided to return that tent and go with ABC Canopy which comes with sidewalls, sandbags to use as tent weights, and a bag.
- Extra Sandbags and Sand: The sandbags that came with the tent held about 18 lbs of sand each, but some of the markets we’ve done required 40 lbs per leg. It’s better to have it and not need it than need it and not have it. Not to mention sand sometimes leaks out in transit and having a spare bag may save you from having to make an emergency trip to the hardware store for more sand. Buy yourself an extra bag of sand too as you’ll need to refill your sandbags regularly between markets.
- 5 gallon buckets and lids: If you have access to a water source at your market this makes as a great alternative to lugging around 40+ pounds of sand. We did this at Charlotte Pride. It saved on weight in our vehicle and we were able to store things inside it when it’s not in use. We dumped the water down the sewer after the festival. Protip: They can double as a seat or a garbage can in a pinch.
- Tent Fan: Outdoor markets in the summer can be brutal. I wish I had gotten this fan earlier. This one has a couple of nice bonus features such as a USB port to charge your phone and an adjustable LED light if your market goes into the evening (if you are like me and you burn on-site you can use it to light up your workspace as well)
- Tables. Make sure you get yourself the right size tables. If you have a 10 x 10 tent I suggest you buy (2) 6’ x 2.5’ tables and (1) 4’ x 2’ tables. This gives you a couple of options for layouts. We typically do a U-shaped or H-shaped layout
- Tablecloths: It creates a finished look when customers come up to shop and it hides bins very nicely.
- Electric generator: I love my Jackery. I use it to burn on site which both gives me something to do if it’s slow and lets people watch me burn. Customers, especially kids, love to see the process of how I make my pieces. It’s been a lifesaver when your phone, card reader, or other electronics run low on battery, and if you do evening markets it serves as a power source for your lights.
- Edison lights: These are perfect for stringing up around your tent. We power about 100 feet on our Jackery.
- Patio umbrellas: These are often a requirement for smaller vendor spaces. We are doing a market that is a smaller 8’ x 5’ space. The first time we did a market with a smaller space we didn’t think to get an umbrella we regretted it. Several hours in direct sunlight can be brutal on your skin.
- Chairs. I bought a chair specifically for my “burn table” but really any camping chair will work. I don’t always use it, but again: I’d rather have one if I need it than want it and not have it. Brian rarely sits during markets but, if unlike him you don’t have a fully caffeinated bloodstream, you may want to get a chair.
- Merchandising. Art, especially pyrography, takes up a lot of space. In order to make sure you’re able to display all of your products you need to plan that out in advance. We use wire cubes that you can build into different configurations. Make sure you pick up some additional connectors because you may need them for different arrangements. We also bought easels to hold up our larger pieces as well as this plate holder from IKEA which allows us to display multiple pieces.
- Small garbage can. You will never find a garbage can when you need one. Having a small can in your tent is very convenient. It is usually in most contracts that the vendor is responsible for all garbage in their area so it is practical as well.
- Lysol wipes. Tables get sticky and dirty. So do hands and displays. It’s a good habit to get into to have something to clean with. If you put it in your “toolkit” it will always be ready.
- Paper towels
- Tissue – nothing worse than having to blow your nose using paper towels all day.
- A Rubber mallet – useful if you need to hammer in stakes for your tent
- A Special Order kit. I like to take special orders while I am on site as opposed to trying to follow up afterward. You can use a tablet if the venue has wifi but usually, it’s just easier to do it on paper. My kit is comprised of a notebook for notes, some custom order sheets, and a business card book. Business cards are nice because I like to connect with other vendors after the market. We’ve done plenty of collaborations with vendors we’ve met at markets. I also write on the business card a trigger word or phrase to remind me of who they are, what they do, and what I possibly want to collaborate with them on.
Create a packing list
Brian and I keep a running list for ourselves of things we need for shows. We are constantly updating it to add/remove things that are imperative for our markets. There’s nothing worse than getting on location, and realizing that you forgot something really important. Every night, before a market, do our run-through of the list and put everything in a pile that goes in the car the next morning.
Create a Toolkit
This is absolutely key. I am a Girl Scout at heart and am always thinking about what I might need. There are things that I needed at every market so I started throwing them in a toolbox to bring with me. Having them all in one place also ensures that I don’t forget these things. I take note of what needs restocking and Brian and I go over our packing list before every market to make sure we have what we need.
- Multi-tool
- Hammer: this one has a hammer, flathead screwdriver, and star-head screwdriver
- Needle nose pliers
- Packing tape
- Painter’s tape
- Credit card reader with charging cord (we use Square)
- Receipt book – if you take cash, some customers want a receipt
- Batteries – if you have any products that require batteries
- Tape runner – you may need to tape something but do not want visible tape. Ex: tape instructions to the back of the product
- Glue Dots – an alternative to a tape runner, but I keep both in my toolkit
- Sawtooth hangers – my product can be hung or set in a display holder. Sometimes I wait to add the hanger onto the back because it scratches the other products during transit
- Screws – when I need to hang things in a booth
- Price tags – the sticky kind like you use for jewelry and the hangtags with string
- Price sticker – I use Avery labels for when I cannot use a hangtag
- zip ties or velcro zip ties – attach the lights to the tent, hold cubes to tent legs, secure products
- Business card holder(s)
- Business cards – if the venue allows them
- 3M hooks and tape – when I need to hang things I attach them to my tables. Stick with lighter objects, especially if you are attaching them to the tablecloth
- Bug Spray
- Sunscreen
- Spray bottle with alcohol – use a small spray bottle from the dollar store
- Spray bottle with water – same as above just with water
- Hanging hooks – I use them to hang products off the wire cubes we use to merchandise
- Twine or sisal – you never know when you need to hang something or tie something up
- Cargo ties – we use these to tie the bins to the handcart and the buckets to the tent legs.
- Scissors
- Sharpies
- Chalk board Markers – if you have chalkboard signs
- Pens
- Pencil and eraser
- Tweezer – sometimes I have to remove a price tag, and it’s just so much easier with tweezers
That may seem like a lot, and it is, but when you are doing a market you don’t have time to fuss with little things. Having everything available makes markets less stressful and allows you to look more professional. I especially encourage you to create your own toolkit. I’d love to hear what you include in your toolkit. Tag us @bz_furfur with your essential items from your toolkit and let us know what we might have missed. If you want to learn about creating product continue on to part three of our series. Until then, stay unique.